Building Views
Views are interactive UIs that render inside AI conversations. They combine server-side data fetching with client-side interactivity. This guide covers everything from basic views to advanced patterns.
View Anatomy
Every view has two parts:
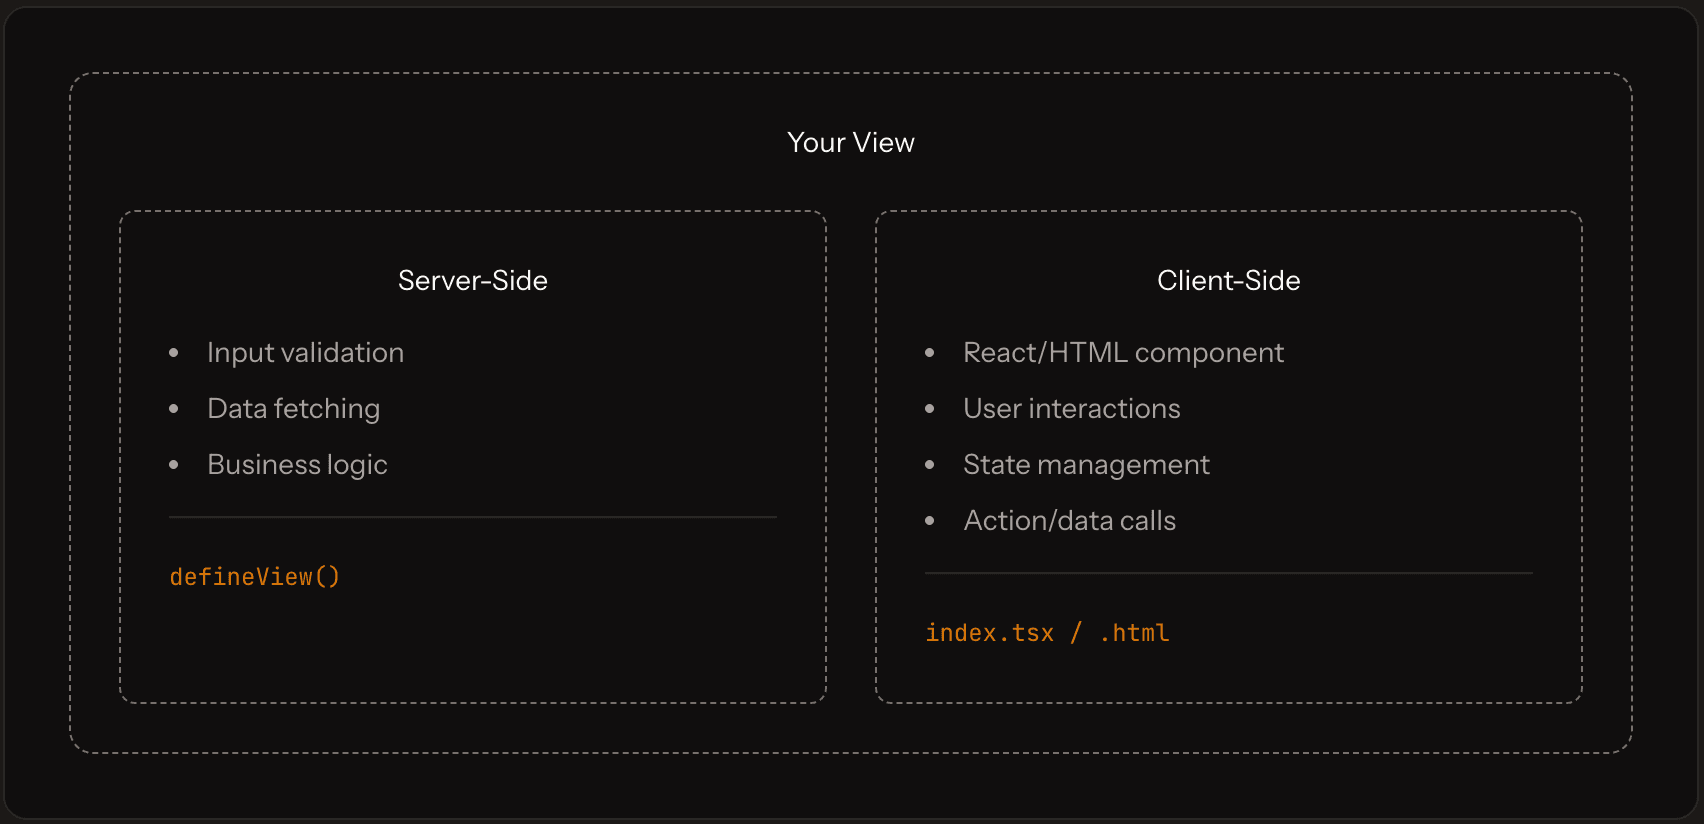
Creating a View
Define the Server Handler
In your src/index.ts, define the view:
import { createApp, defineView } from '@pancake-apps/server';
import { z } from 'zod';

const app = createApp({
  name: 'my-app',
  version: '0.1.0',

  views: {
    dashboard: defineView({
      description: 'User dashboard with stats and recent activity',
      input: z.object({
        userId: z.string().describe('User ID to show dashboard for'),
      }),
      data: z.object({
        user: z.object({
          name: z.string(),
          email: z.string(),
        }),
        stats: z.object({
          totalOrders: z.number(),
          totalSpent: z.number(),
        }),
      }),
      handler: async ({ userId }) => {
        const user = await getUser(userId);
        const stats = await getUserStats(userId);
        return { user, stats };
      },
      ui: { html: './src/views/dashboard/index.html' },
    }),
  },
});
Create the React Component
// src/views/dashboard/index.tsx
import React from 'react';
import { createRoot } from 'react-dom/client';
import {
  PancakeProvider,
  useViewParams,
  useTheme,
} from '@pancake-apps/web';

function Dashboard() {
  const { data } = useViewParams<
    { userId: string },
    { user: { name: string; email: string }; stats: { totalOrders: number; totalSpent: number } }
  >();
  const theme = useTheme();

  return (
    <div style={{
      padding: '2rem',
      fontFamily: 'system-ui',
      background: theme === 'dark' ? '#1a1a1a' : '#fff',
      color: theme === 'dark' ? '#fff' : '#000',
      minHeight: '100vh',
    }}>
      <h1>Welcome, {data?.user.name}</h1>
      <div style={{ display: 'grid', gridTemplateColumns: '1fr 1fr', gap: '1rem', marginTop: '1rem' }}>
        <StatCard label="Total Orders" value={data?.stats.totalOrders || 0} />
        <StatCard label="Total Spent" value={`$${data?.stats.totalSpent || 0}`} />
      </div>
    </div>
  );
}

function StatCard({ label, value }: { label: string; value: string | number }) {
  const theme = useTheme();
  return (
    <div style={{
      padding: '1.5rem',
      background: theme === 'dark' ? '#2a2a2a' : '#f5f5f5',
      borderRadius: '8px',
    }}>
      <div style={{ fontSize: '0.875rem', opacity: 0.7 }}>{label}</div>
      <div style={{ fontSize: '2rem', fontWeight: 'bold' }}>{value}</div>
    </div>
  );
}

function App() {
  return (
    <PancakeProvider>
      <Dashboard />
    </PancakeProvider>
  );
}

createRoot(document.getElementById('root')!).render(<App />);
Create the HTML Entry
<!-- src/views/dashboard/index.html -->
<!DOCTYPE html>
<html lang="en">
<head>
  <meta charset="UTF-8" />
  <meta name="viewport" content="width=device-width, initial-scale=1.0" />
  <title>Dashboard</title>
</head>
<body>
  <div id="root"></div>
  <script type="module" src="./index.tsx"></script>
</body>
</html>
The PancakeProvider
Every React view must be wrapped with PancakeProvider:
import { PancakeProvider } from '@pancake-apps/web';

function App() {
  return (
    <PancakeProvider>
      <YourView />
    </PancakeProvider>
  );
}
The provider:
- Establishes connection with the AI host
- Provides context for all Pancake hooks
- Handles protocol-specific communication
- Manages the view lifecycle
Never use Pancake hooks outside of the PancakeProvider tree.
Essential Hooks
useViewParams
Access input parameters and server data:
const { inputs, data } = useViewParams<InputType, DataType>();

// inputs: Parameters passed to the view (from AI or URL)
// data: Data returned by the handler
useViewState
Persist state across re-renders:
const [value, setValue] = useViewState(initialValue);

// Like useState, but persists in the host
// Survives component unmounts and remounts
useTheme
Get the current theme:
const theme = useTheme(); // 'light' | 'dark'useNavigation
Navigate to other views or message the AI:
const { navigate, say } = useNavigation();

// Navigate to another view
navigate('other-view', { param: 'value' });

// Send a message to the AI
say('Help me with this');
useAction
Call actions (write operations):
const { dispatch } = useAction();

const result = await dispatch('actionName', { input: 'value' });
useData
Fetch data (read operations):
const { getData } = useData();

const items = await getData('dataEndpoint', { limit: 10 });
Styling for AI Hosts
Views render inside AI interfaces. Design accordingly.
Theme Support
Always support both light and dark themes:
function ThemedView() {
  const theme = useTheme();

  return (
    <div style={{
      background: theme === 'dark' ? '#1a1a1a' : '#ffffff',
      color: theme === 'dark' ? '#ffffff' : '#000000',
    }}>
      {/* content */}
    </div>
  );
}
Or use CSS variables:
.view {
  --bg: #ffffff;
  --text: #000000;
}

.view.dark {
  --bg: #1a1a1a;
  --text: #ffffff;
}

.view {
  background: var(--bg);
  color: var(--text);
}
Responsive Design
Views appear in various viewport sizes:
.grid {
  display: grid;
  gap: 1rem;
  grid-template-columns: 1fr;
}

@media (min-width: 400px) {
  .grid {
    grid-template-columns: repeat(2, 1fr);
  }
}

@media (min-width: 600px) {
  .grid {
    grid-template-columns: repeat(3, 1fr);
  }
}
Keep It Lightweight
Views load inside chat interfaces. Optimize for fast loading:
- Minimize bundle size
- Use CSS animations over JavaScript
- Lazy-load heavy content
- Compress images
Handling User Interactions
Button Actions
function OrderCard({ order }) {
  const { dispatch } = useAction();
  const [loading, setLoading] = useState(false);

  const handleCancel = async () => {
    setLoading(true);
    try {
      await dispatch('cancelOrder', { orderId: order.id });
    } finally {
      setLoading(false);
    }
  };

  return (
    <div>
      <h3>Order #{order.id}</h3>
      <button onClick={handleCancel} disabled={loading}>
        {loading ? 'Cancelling...' : 'Cancel Order'}
      </button>
    </div>
  );
}
Form Submission
function ContactForm() {
  const { dispatch } = useAction();

  const handleSubmit = async (e: React.FormEvent<HTMLFormElement>) => {
    e.preventDefault();
    const formData = new FormData(e.currentTarget);

    await dispatch('submitContact', {
      name: formData.get('name'),
      email: formData.get('email'),
      message: formData.get('message'),
    });
  };

  return (
    <form onSubmit={handleSubmit}>
      <input name="name" placeholder="Name" required />
      <input name="email" type="email" placeholder="Email" required />
      <textarea name="message" placeholder="Message" required />
      <button type="submit">Send</button>
    </form>
  );
}
Continuing the Conversation
function SearchResults({ results }) {
  const { say } = useNavigation();

  const askForMore = (item) => {
    say(`Tell me more about ${item.name}`);
  };

  return (
    <div>
      {results.map(item => (
        <div key={item.id}>
          <h3>{item.name}</h3>
          <button onClick={() => askForMore(item)}>Learn More</button>
        </div>
      ))}
    </div>
  );
}
Error Handling
Handle errors gracefully:
function RobustView() {
  const { data } = useViewParams();
  const [error, setError] = useState<string | null>(null);
  const { getData } = useData();

  const loadMore = async () => {
    try {
      await getData('moreItems', {});
      setError(null);
    } catch (e) {
      setError(e.message);
    }
  };

  if (error) {
    return (
      <div>
        <p>Something went wrong: {error}</p>
        <button onClick={loadMore}>Try Again</button>
      </div>
    );
  }

  return <MainContent data={data} onLoadMore={loadMore} />;
}
View Discovery
Instead of defining views inline, auto-discover from the filesystem:
import { discoverViews } from '@pancake-apps/server';

const app = createApp({
  name: 'my-app',
  version: '0.1.0',
  views: discoverViews('./src/views'),
});
Directory structure:
src/views/
├── dashboard/
│   ├── index.html
│   ├── index.tsx
│   └── metadata.json
├── settings.html
└── settings.json
Metadata file:
{
  "description": "User dashboard with stats",
  "visibility": "both"
}
Next Steps
- Views, Actions, and Data: Understand the building blocks
- Examples: See working view implementations
- API Reference: Complete hook documentation